
Cuban bread, or “Pan Cubano,” is more than just a staple of Cuban cuisine—it’s a symbol of tradition, culture, and community. Whether you’ve had a delicious Cuban sandwich or enjoyed a fresh, crusty loaf with butter, there’s nothing quite like the taste of homemade Cuban bread.
Baking this bread is not only about following a recipe; it’s about embracing a piece of history. Cuban bread dates back to the early Cuban immigrant communities in Florida, particularly in Tampa and Miami, where it became an essential part of the culinary landscape. The distinct texture—crispy on the outside, soft and airy on the inside—makes it perfect for sandwiches, dipping in soups, or simply enjoying warm with butter.
Many bakeries in Cuba and Cuban-American communities follow traditional methods, often baking loaves in steam-filled ovens and using a palmetto leaf to create the signature crust. While it may seem intimidating to bake at home, this recipe simplifies the process, making it easy for anyone to recreate authentic Pan Cubano from scratch.
In this article, we’ll guide you through an easy and authentic Pan Cubano recipe that you can make at home, even if you’ve never baked bread before. You’ll learn about its unique ingredients, step-by-step instructions, and essential baking tips to achieve the perfect Cuban bread every time.
Table of Contents
What is Cuban Bread?
Cuban bread is a white bread with a thin, crisp crust and a soft, airy interior. It is traditionally baked with a palmetto leaf on top, which helps create its signature crust. This bread is essential for making Cuban sandwiches (Medianoche or Cubano) and is best enjoyed fresh.
Ingredients for Authentic Cuban Bread
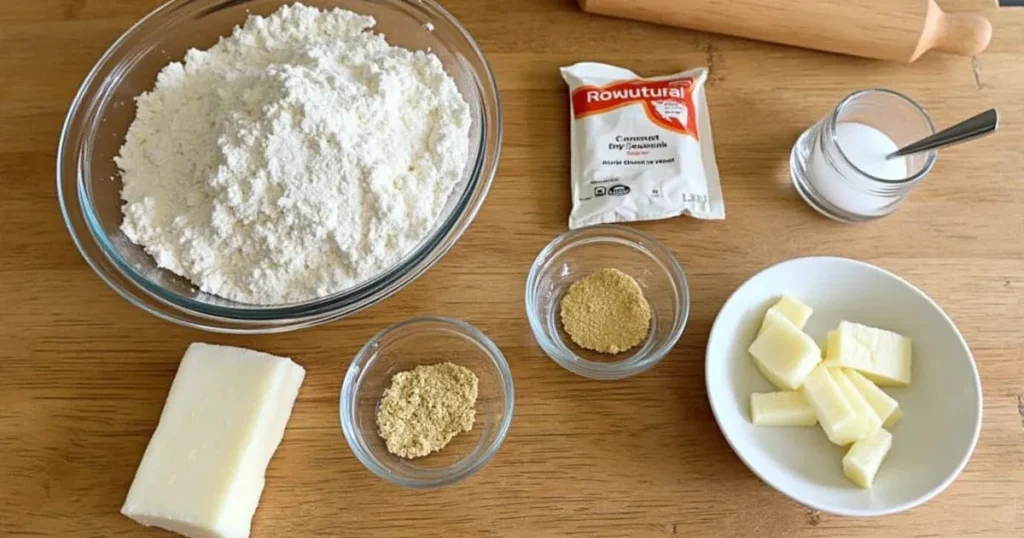
The secret to authentic Cuban bread lies in its simple yet carefully chosen ingredients. Each component plays a crucial role in achieving the bread’s signature flavor, texture, and crust.
- Bread Flour: High-protein bread flour helps create a chewy yet airy texture, giving the bread its perfect balance of softness and structure.
- Warm Water: The right temperature (about 110°F or 43°C) is essential to activating the yeast properly and ensuring a good rise.
- Active Dry Yeast: Yeast is the leavening agent that allows the dough to rise, creating the signature light and fluffy interior of Cuban bread.
- Sugar: A small amount of sugar helps feed the yeast, aiding fermentation and adding a touch of sweetness to balance the flavor.
- Salt: Enhances the overall taste and regulates yeast activity, preventing the bread from over-rising.
- Lard (or Butter): Lard is traditionally used in Cuban bread to add a subtle richness and create a tender crumb. If unavailable, butter can be used as a substitute, though it may slightly alter the flavor and texture.
- Palmetto Leaf (Optional): The palmetto leaf is a traditional touch placed on top before baking, helping to create the signature crust and aesthetic appeal of authentic Cuban bread.
| Ingredient | Quantity |
|---|---|
| Bread flour | 4 cups |
| Warm water | 1 1/2 cups |
| Active dry yeast | 1 packet (2 1/4 tsp) |
| Sugar | 1 tablespoon |
| Salt | 2 teaspoons |
| Lard (or butter) | 2 tablespoons |
| Palmetto leaf (optional) | 1 piece |
Using these ingredients in the right proportions ensures a perfect balance of crustiness, chewiness, and flavor, making this bread a true Cuban classic.
Step-by-Step Instructions to Make Cuban Bread
Making authentic Cuban bread at home is a rewarding experience, and while the process takes time, the steps are simple and straightforward. Follow this detailed guide to create a perfect loaf with a crispy crust and soft, airy interior.
Preparing the Dough
- Activate the Yeast
- In a small bowl, combine 1 ½ cups of warm water (about 110°F or 43°C), 1 tablespoon of sugar, and 1 packet (2 ¼ teaspoons) of active dry yeast.
- Stir gently and let the mixture sit for 5-10 minutes until it becomes frothy and bubbly. This step confirms that the yeast is active and capable of making the bread rise.
- Mixing the Ingredients
- In a large mixing bowl, combine 4 cups of bread flour and 2 teaspoons of salt.
- Gradually pour in the activated yeast mixture, stirring with a wooden spoon or spatula until a rough dough forms.
- Add 2 tablespoons of lard (or butter, if substituting) and mix until well incorporated.
- Kneading the Dough
- Transfer the dough onto a lightly floured surface and knead for 8-10 minutes.
- The dough should change from being sticky to becoming smooth and elastic. If it feels too sticky, add a small amount of flour, but avoid using too much as it can make the bread dense.
- To test if the dough is ready, perform the “windowpane test”—stretch a small piece of dough between your fingers; if it stretches thin enough to let light pass through without tearing, the gluten is well developed.
Proofing the Dough
- Lightly coat a large bowl with oil and place the dough inside. Cover it with a damp cloth or plastic wrap.
- Let the dough rest in a warm, draft-free area for 1-2 hours, or until it doubles in size.
- Ideal proofing temperature: 75-85°F (24-29°C).
- If your kitchen is too cool, place the bowl inside a slightly warm oven (turned off) or next to a bowl of warm water.
- To check if the dough has risen enough, gently press it with your finger—if it slowly springs back, it’s ready for the next step.
Shaping and Baking
- Shaping the Loaf
- After the dough has risen, press it down gently to release trapped air bubbles.
- Divide it into two equal portions and shape each into a long, narrow loaf (about 14 inches long).
- Arrange the shaped loaves on a parchment-lined baking sheet.
- Final Proofing
- Drape a clean kitchen towel over the loaves and allow them to rise again for 30-45 minutes until slightly puffy.
- If using a palmetto leaf, place one on top of each loaf just before baking.
- Baking the Bread
- Preheat your oven to 375°F (190°C).
- To create a crispier crust, place a shallow pan of hot water on the lower rack to generate steam.
- Bake for 20-25 minutes or until the loaves develop a golden-brown crust.
- To test if it’s fully baked, tap the bottom of the loaf—it should produce a hollow sound.
- Cooling and Serving
- Once baked, transfer the loaves from the oven to a wire cooling rack.
- Let them cool slightly before slicing. Cuban bread is best enjoyed warm and fresh, but you can also store it in an airtight bag for up to two days.
Now, your authentic Cuban bread is ready to be used for Cuban sandwiches, enjoyed with butter, or served alongside your favorite meals!
Would you like me to refine any part of the instructions or add any alternative methods (e.g., making it in a bread machine)?
Tips for the Perfect Pan Cubano
Making Cuban bread may seem simple, but achieving the perfect balance of a crispy crust and airy, soft interior requires attention to detail. Below are essential tips to ensure your Pan Cubano turns out authentic, flavorful, and perfectly textured every time.
1. Use Fresh, High-Quality Ingredients
- Fresh yeast is crucial for a good rise. If your yeast doesn’t foam during activation, it may be expired. Always check the date on the package before using it.
- Bread flour vs. all-purpose flour – Bread flour has a higher protein content, which helps develop a stronger gluten structure, resulting in a better texture.
- Lard is key – While some recipes substitute butter or vegetable shortening, lard is what gives Cuban bread its signature flavor and soft crumb.
2. Perfecting the Dough
- Hydration matters – If your dough feels too dry, add a tablespoon of water at a time. If it’s too sticky, sprinkle in a small amount of flour, but avoid over-flouring as it can make the bread dense.
- Proper kneading – Knead for at least 8-10 minutes until the dough becomes smooth and elastic. If using a stand mixer, knead on medium speed with a dough hook for about 5-7 minutes.
- The “windowpane test” – To check if the gluten has developed properly, take a small piece of dough and stretch it. If it stretches into a thin “window” without tearing, it’s ready.
3. Mastering the Proofing Process
- First rise matters – Allow the dough to double in size during the first proof (typically 1-2 hours). If rushed, the bread will turn out dense.
- Ideal proofing environment – The best temperature for dough to rise is around 75-85°F (24-29°C). If your kitchen is cooler, place the dough in a slightly warm (turned-off) oven or next to a bowl of warm water.
- Over-proofing risks – If the dough rises for too long, it may collapse or create a weak structure. If you gently press the dough and it doesn’t spring back, it has over-proofed.
4. Shaping the Loaf Like a Pro
- Punching down the dough – After the first proof, gently press down the dough to remove large air bubbles, which ensures even texture.
- Rolling technique – Shape the dough into long loaves by rolling it tightly from one side to the other, then pinch the seam closed for a smooth finish.
- Spacing on the baking sheet – Leave at least 2 inches between loaves so they have enough room to expand while baking.
5. Creating the Signature Crust
- Use a palmetto leaf (optional but traditional) – Placing a palmetto leaf on top before baking helps create the classic Cuban bread crust.
- Baking with steam – To achieve a crisp crust, place a shallow pan of hot water on the lower rack of the oven. The steam will enhance the texture.
- Spritzing the oven – Some bakers spray water inside the oven right before baking to create extra humidity.
6. Baking and Cooling Techniques
- Oven temperature precision – Bake at 375°F (190°C) for 20-25 minutes, checking for an even golden-brown crust.
- Tap test for doneness – Gently tap the bottom of the bread; if it sounds hollow, it’s fully baked.
- Cooling is important – Allow the bread to cool on a wire rack before slicing. Slicing too soon may lead to a gummy texture.
7. Storing and Reheating Cuban Bread
- Best enjoyed fresh—since Cuban bread lacks preservatives, it’s best consumed the same day.
- Short-term storage – If needed, store in a paper bag or wrapped in a clean kitchen towel for up to 2 days. Avoid storing in plastic bags, as they can soften the crust.
- For longer storage—tightly wrap in plastic wrap and freeze for up to three months. To restore crispness, reheat in a 350°F (175°C) oven for 5-7 minutes.
By following these tips, you’ll create authentic, bakery-quality Cuban bread every time. Would you like any additional troubleshooting tips or variations?
Common Mistakes to Avoid
Baking Cuban bread might seem straightforward, but small missteps can affect the texture, flavor, and overall quality of the final loaf. Here are some common mistakes to watch out for and tips on how to avoid them, ensuring your Pan Cubano turns out perfectly every time.
1. Using the Wrong Type of Flour
- Mistake: Using all-purpose flour instead of bread flour.
- Why It’s a Problem: Bread flour has a higher protein content, which helps develop gluten, leading to a chewier and airier texture—hallmarks of authentic Cuban bread.
- Solution: Always use bread flour for the best results. If all-purpose flour is your only option, expect a slightly denser texture.
2. Not Activating the Yeast Properly
- Mistake: Skipping yeast activation or using water that’s too hot or too cold.
- Why It’s a Problem: If the water is too hot (above 120°F/49°C), it will kill the yeast. If it’s too cold (below 100°F/38°C), the yeast won’t activate properly, leading to poor rising.
- Solution: Use warm water around 110°F (43°C) and let the yeast sit for 5-10 minutes until it becomes frothy and bubbly—a sign that it’s active. If no bubbles appear, the yeast may be expired.
3. Skipping or Rushing the Kneading Process
- Mistake: Not kneading the dough long enough or over-kneading it.
- Why It’s a Problem: Kneading helps develop gluten, which is essential for the bread’s structure.
- Under-kneaded dough results in a crumbly, dense loaf.
- Over-kneading (especially with a mixer) can make the bread too tight and chewy.
- Solution: Knead the dough for 8-10 minutes by hand or 5-7 minutes in a stand mixer until it becomes smooth and elastic. Perform the windowpane test by stretching a small piece—if it forms a thin “window” without tearing, the gluten is developed.
4. Not Allowing Enough Proofing Time
- Mistake: Rushing the rising process or over-proofing the dough.
- Why It’s a Problem:
- If you don’t give the dough enough time to rise, the yeast won’t develop properly, resulting in a dense, heavy loaf.
- If you let it rise for too long, the dough can collapse, leading to a flat, weak loaf.
- Solution:
- First proofing should last 1-2 hours, or until the dough doubles in size.
- Second proofing (after shaping) should last 30-45 minutes.
- To test if the dough is ready, gently press it—if it slowly springs back, it’s ready for the next step.
5. Not Shaping the Loaf Correctly
- Mistake: Handling the dough too roughly or not rolling it tightly.
- Why It’s a Problem: Poor shaping can lead to uneven baking, dense spots, or a loaf that doesn’t rise well in the oven.
- Solution:
- Roll the dough into a tight log and pinch the seam closed to maintain structure.
- Place the seam-side down on the baking sheet for an even rise.
6. Ignoring the Role of Steam in Baking
- Mistake: Baking Cuban bread in a dry oven without steam.
- Why It’s a Problem: Steam is essential for developing a crispy, golden crust while keeping the inside soft. Without it, the crust may turn out too thick and tough.
- Solution:
- Place a shallow pan of hot water on the bottom rack of the oven.
- For added moisture, lightly mist the loaves with water before baking.
7. Not Using a Palmetto Leaf (Optional, but Traditional)
- Mistake: Skipping the palmetto leaf or substituting it with something else.
- Why It’s a Problem: While not essential for baking success, the palmetto leaf helps create the traditional look and crust of Cuban bread. It also prevents the top from splitting unevenly.
- Solution: If available, place a clean palmetto leaf across the top of the dough before baking. If you can’t find one, your bread will still taste great without it.
8. Overbaking or Underbaking the Bread
- Mistake: Taking the bread out of the oven too early or baking it for too long.
- Why It’s a Problem:
- Underbaked bread may have a doughy, gummy interior.
- Overbaked bread will be too hard and dry.
- Solution:
- Bake at 375°F (190°C) for 20-25 minutes until the crust is golden brown.
- To check if it’s done, tap the bottom of the loaf—it should sound hollow.
9. Slicing the Bread Too Soon
- Mistake: Cutting into the bread immediately after baking.
- Why It’s a Problem: The bread continues to set and develop texture as it cools. Cutting too soon can make it feel dense and gummy.
- Solution: Let the bread cool on a wire rack for at least 15-20 minutes before slicing.
10. Improper Storage Leading to Stale Bread
- Mistake: Storing Cuban bread in plastic bags or leaving it uncovered.
- Why It’s a Problem:
- Plastic bags trap moisture, making the crust soft and soggy.
- Leaving it out uncovered causes it to dry out quickly.
- Solution:
- Store in a paper bag or wrap in a clean kitchen towel for up to 2 days.
- To keep it longer, freeze it, then reheat in an oven at 350°F (175°C) for 5-7 minutes before serving.
Final Thoughts
Avoiding these common mistakes will help you achieve perfect, bakery-quality Cuban bread every time. Whether you’re making it for a Cuban sandwich or just to enjoy with butter, following these tips will ensure your bread has the light, airy texture and crisp crust that makes Pan Cubano so special.
Would you like additional troubleshooting tips for specific issues (e.g., why your bread didn’t rise)?
Frequently Asked Questions (FAQ)
When making Cuban bread, beginners and even experienced bakers often have questions about the process, substitutions, and best practices. Below are answers to some of the most commonly asked questions to help you achieve perfect Pan Cubano every time.
1. Can I Make Cuban Bread Without Lard?
Yes, you can substitute lard with butter or vegetable shortening, but it’s important to note that lard is what gives Cuban bread its authentic flavor and texture. Lard creates a lighter, flakier crumb compared to butter or shortening, which can result in a slightly denser loaf.
If you prefer a vegetarian or dairy-free option:
- Use an equal amount of vegetable shortening for a similar texture.
- Butter adds a richer flavor but may make the crumb slightly denser.
- Olive oil can be used, but it will change the traditional taste and texture.
For the most authentic results, using lard is recommended.
2. What Makes Cuban Bread Different from Other Breads?
Cuban bread is unique because of its light, airy texture and thin, crispy crust. Several key factors set it apart from other types of bread:
- Lard in the dough – This contributes to its fluffy interior and slightly crisp crust.
- No sugar or milk – Unlike other white breads like brioche or sandwich bread, Cuban bread doesn’t contain added sugars or dairy, which helps it stay light and not overly rich.
- Palmetto leaf topping (optional) – Traditional Cuban bread is baked with a palmetto leaf on top, giving it its signature crust pattern.
- Baking with steam – This creates a crispier crust while keeping the inside soft.
Cuban bread is specifically designed for making Cuban sandwiches (Cubanos) but is also great for dipping in soups, slathering with butter, or enjoying fresh.
3. Can I Store Cuban Bread for Later?
Cuban bread is best eaten fresh on the same day it’s baked. If storage is necessary, follow these steps:
- Short-term storage (1-2 days): Wrap the bread in a clean kitchen towel or store it in a paper bag at room temperature. Avoid using plastic bags, as they retain moisture and soften the crust.
- Freezing for longer storage: If you need to store Cuban bread for more than a couple of days, freeze it:
- Let the bread cool completely.
- Wrap tightly in plastic wrap before placing it in a freezer-safe bag.
- Freeze for up to 3 months.
- Reheating frozen Cuban bread:
- Preheat your oven to 350°F (175°C).
- Place the frozen loaf directly in the oven for 5-7 minutes until warmed through and the crust is crisp again.
Avoid refrigerating Cuban bread, as it dries out quickly in the fridge.
4. Why Is a Palmetto Leaf Used on Cuban Bread?
The palmetto leaf is a traditional touch used by Cuban bakeries to create the bread’s signature crust. While it doesn’t add flavor, it serves a few key purposes:
- It keeps the top of the bread from cracking unevenly as it bakes.
- It creates a distinctive indentation in the crust, a hallmark of traditional Pan Cubano.
- It connects to Cuban heritage and authenticity, as this practice has been used in Cuban bakeries for generations.
If you can’t find a palmetto leaf, your bread will still bake beautifully. Some bakers use parchment paper or simply bake without it, and the result is still delicious.
5. How Do I Make My Cuban Bread Crust Extra Crispy?
Achieving the perfect crispy crust on Cuban bread requires a few key baking techniques:
- Bake with steam – Place a shallow pan of hot water on the bottom rack of your oven. This will create steam, helping develop a thin, crackly crust.
- Use a baking stone or preheated baking sheet – This helps distribute heat evenly and mimics a professional bakery oven.
- Spritz the oven with water – Some bakers spray a little water inside the oven right after placing the bread inside, creating additional steam.
- Bake at the right temperature – Keep the oven at 375°F (190°C) to allow the bread to develop a crisp crust while staying soft inside.
- Let the bread cool properly – Allowing the bread to cool on a wire rack prevents it from becoming soggy from trapped steam inside.
By following these techniques, your Cuban bread will have the perfect crunch on the outside and remain light and airy inside.
Conclusion
Making authentic Cuban bread at home is easier than you think. With simple ingredients and careful steps, you can enjoy the rich tradition of Pan Cubano in your own kitchen. Whether you’re making Cuban sandwiches or just enjoying it warm with butter, this bread is sure to bring the taste of Cuba into your home.